Updated on March 25, 2008: screwdriver-less installation.
Updated on February 25, 2008: minor updates to the boot image. Mainly, I had forgotten to update /etc/securetty after the kernel update had changed the serial tty names. This made my instructions not work when you followed them - whoops ! Sorry !
Updated on February 10, 2008: kernel support has been merged into 2.6.24 mainline, updated accordingly. Also updated boot image to account for various etch security updates.
Updated on August 10, 2007: updated boot image to final etch release, and updated kernel to Aurelien Jarno's 2.6.22 based tree.
The wgt634u has a serial connector header inside, and one can make a cable to connect this header to a standard RS232 serial connector. Once a serial connection is available, we will use it to access the wgt634u's bootloader called CFE and make it upload new kernels thru TFTP - there are other ways to load a kernel, but they are more error prone and leave no easy way to recover if the kernel we try won't work.
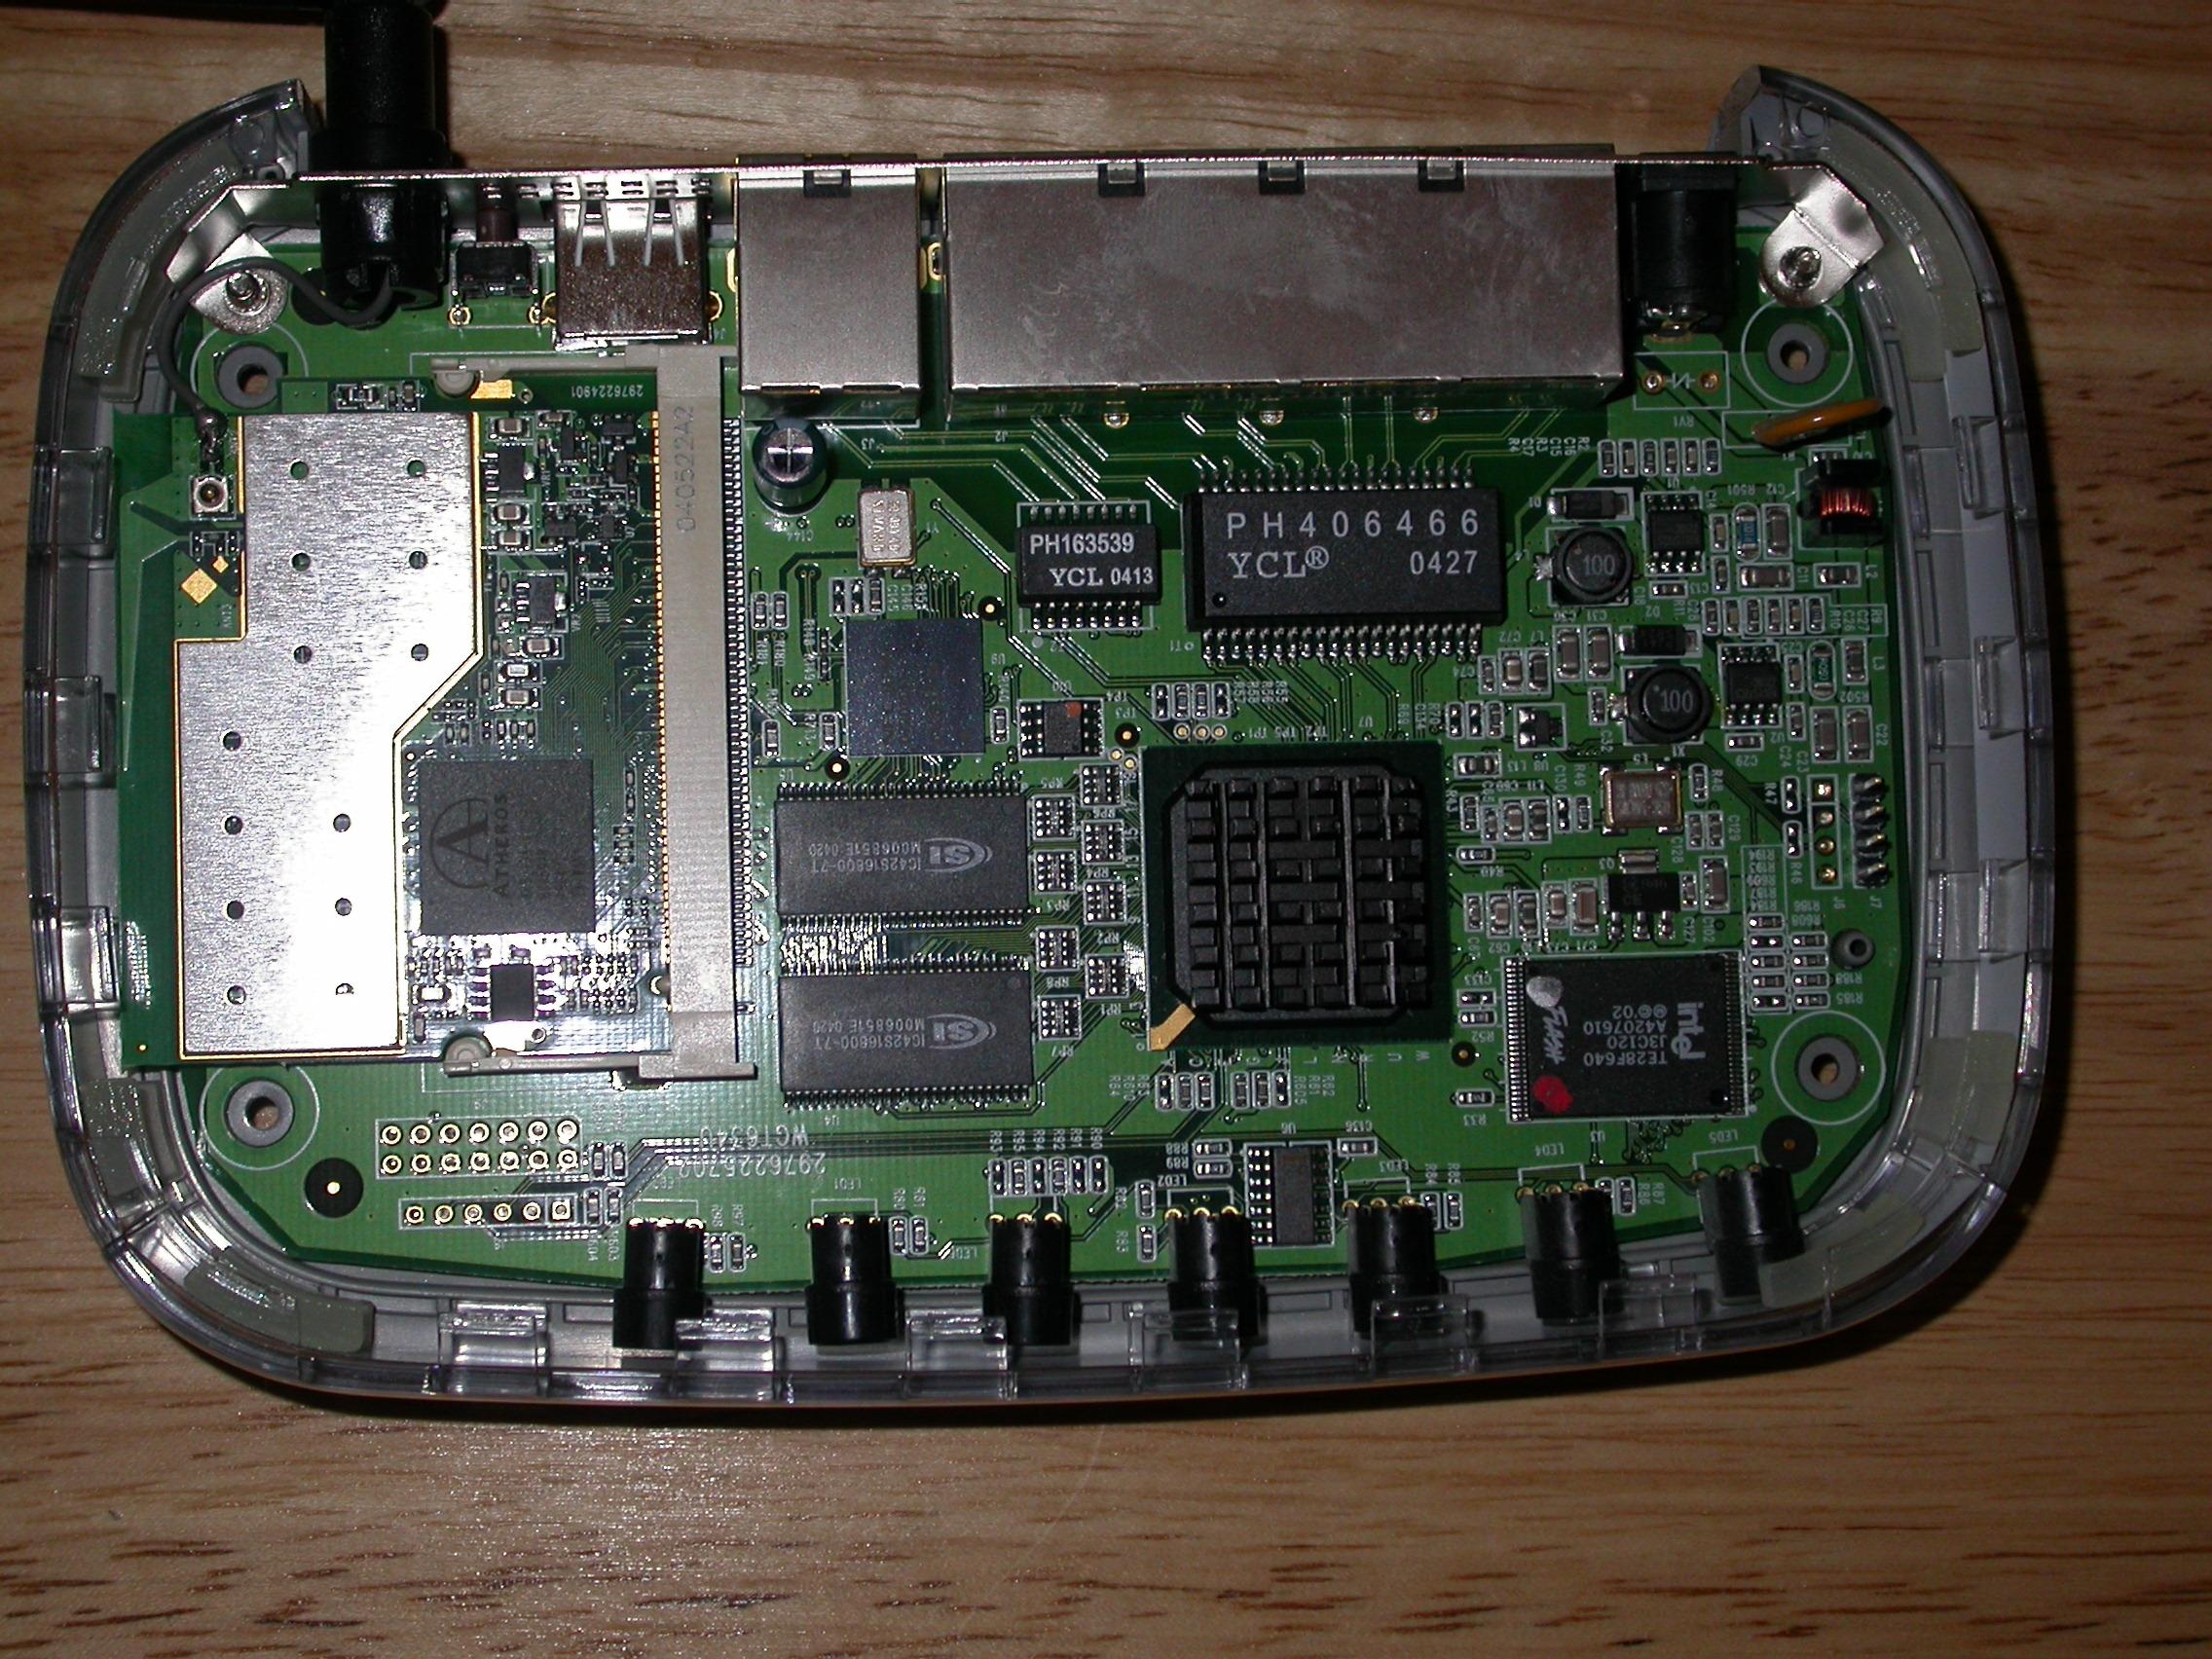
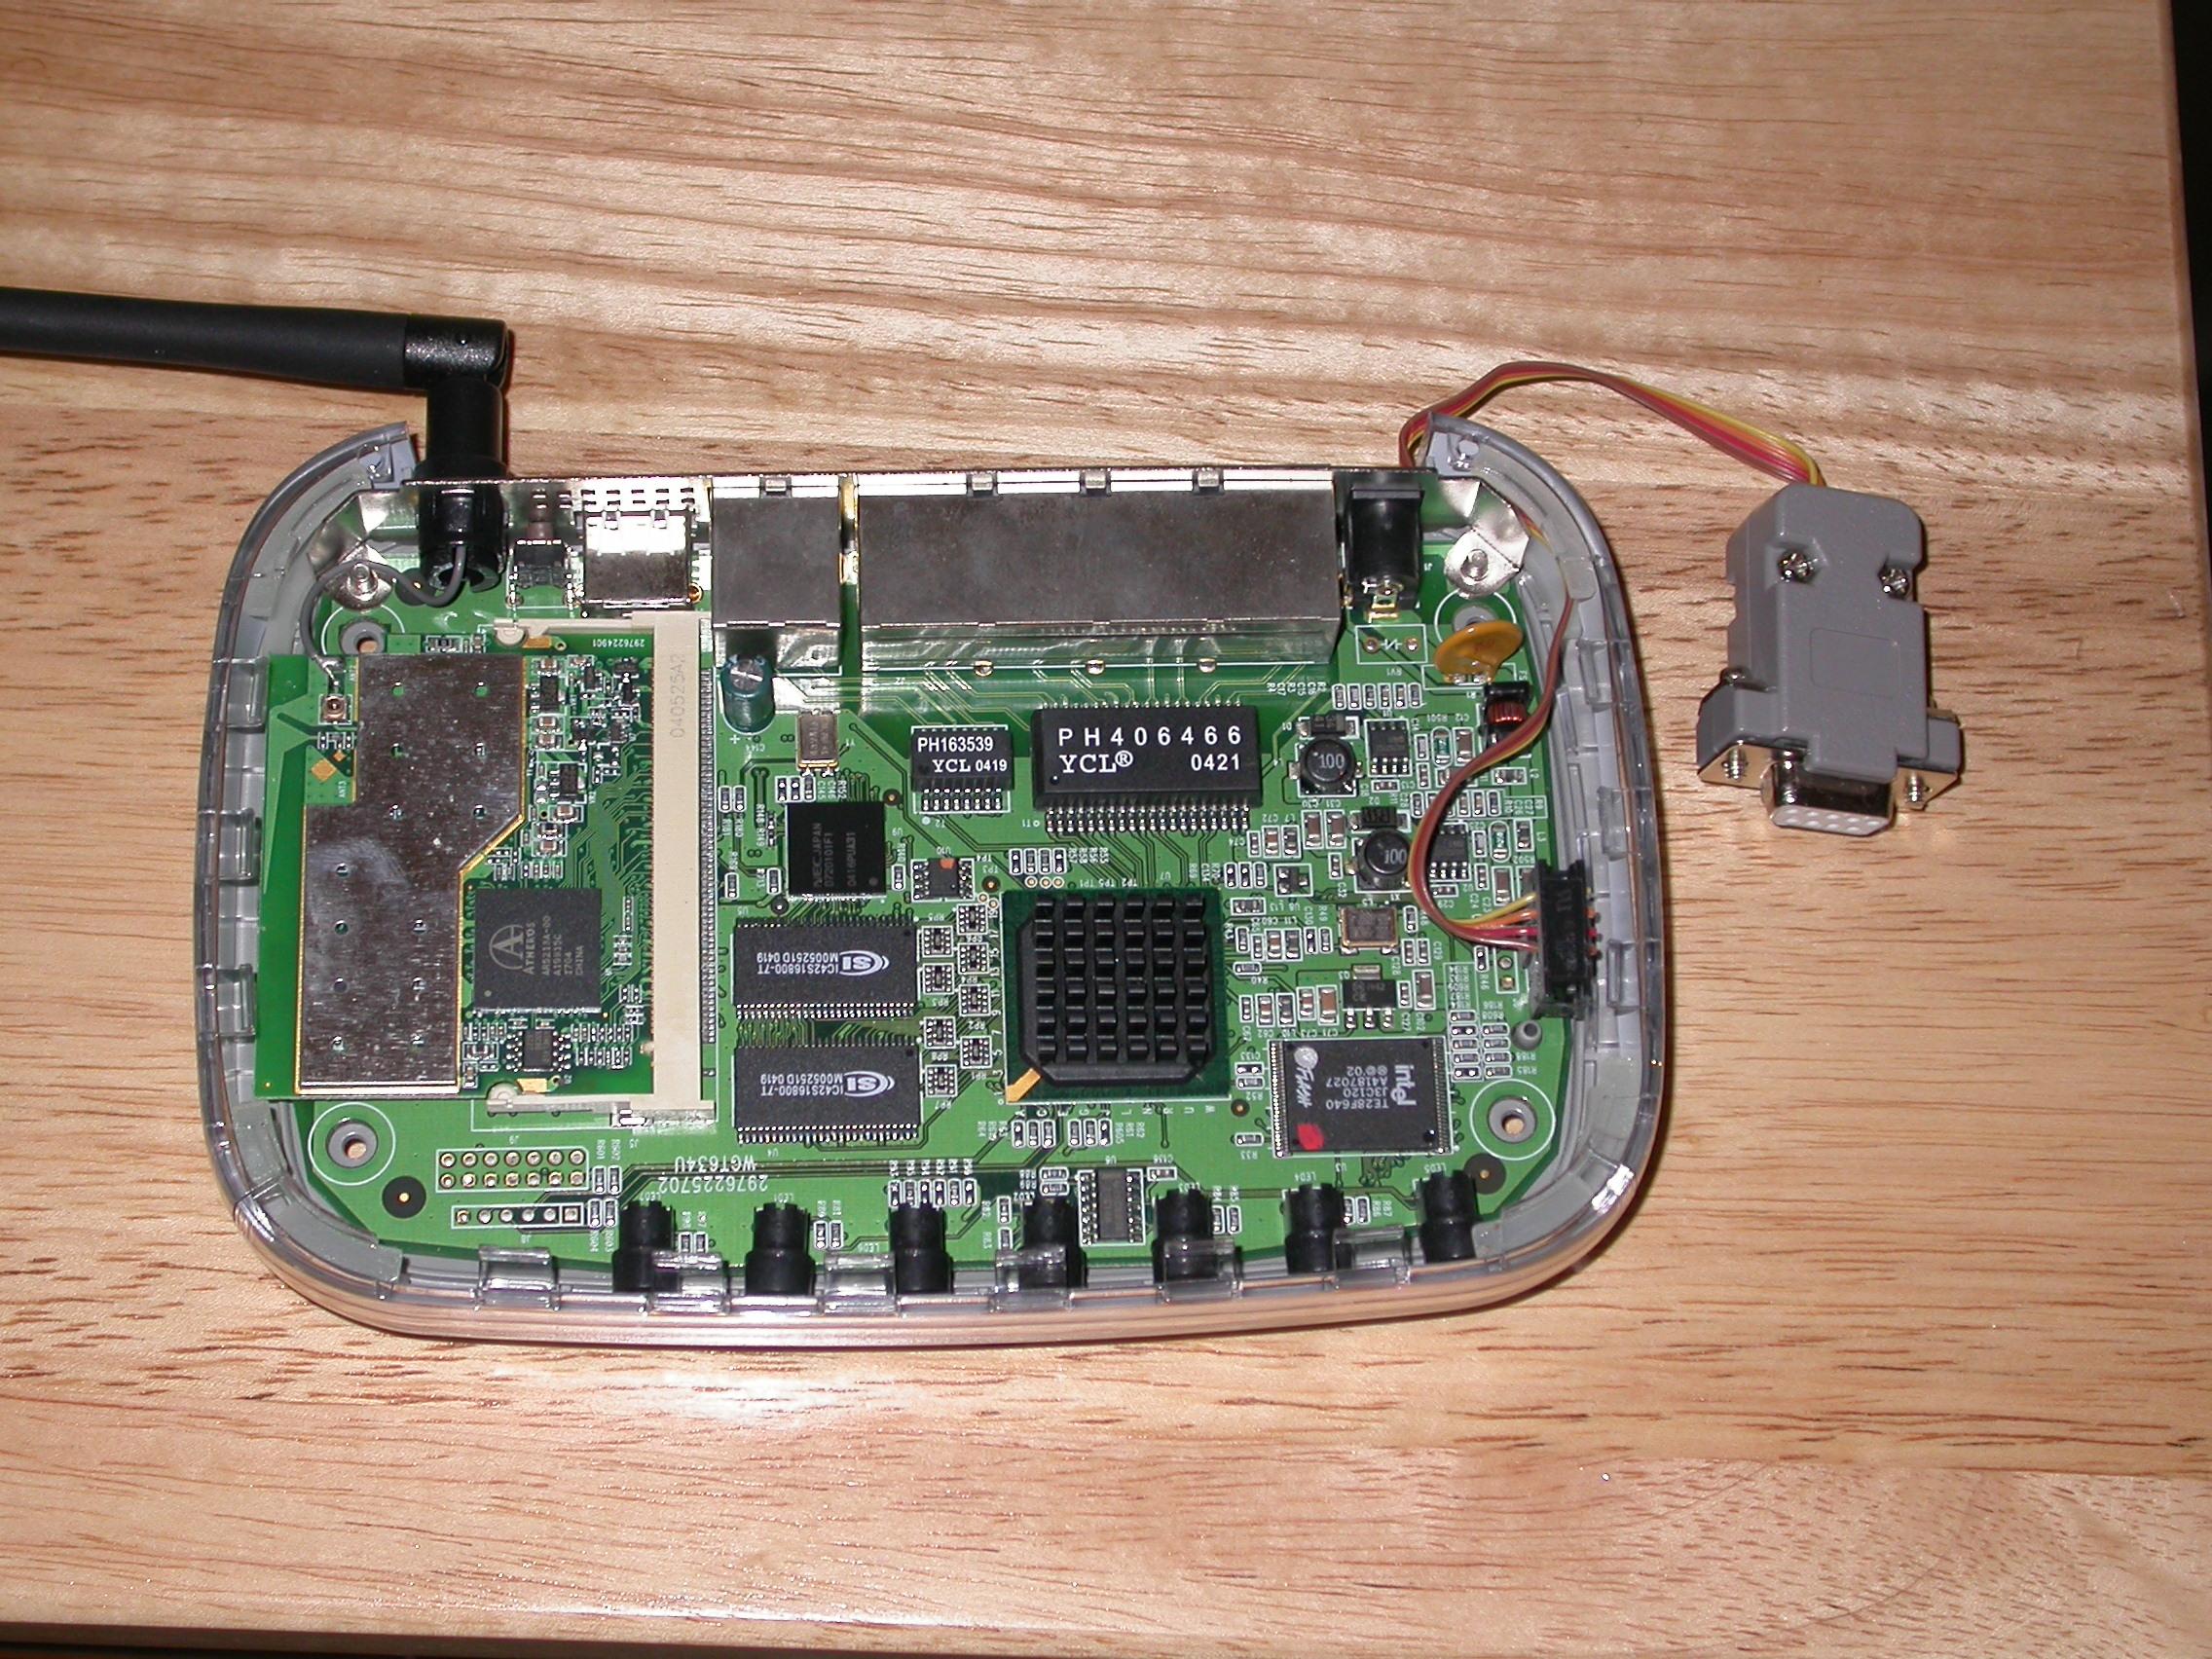
When the wgt634u is opened and oriented so that the ethernet connectors are on top, the serial header is visible on the right hand side. It is identified as J7 on the PCB. There are actually two serial ports on the PCB, but only J7 has pre-soldered headers. The pinout is, from top to bottom, VCC(+3v)/TX/RX/GND.
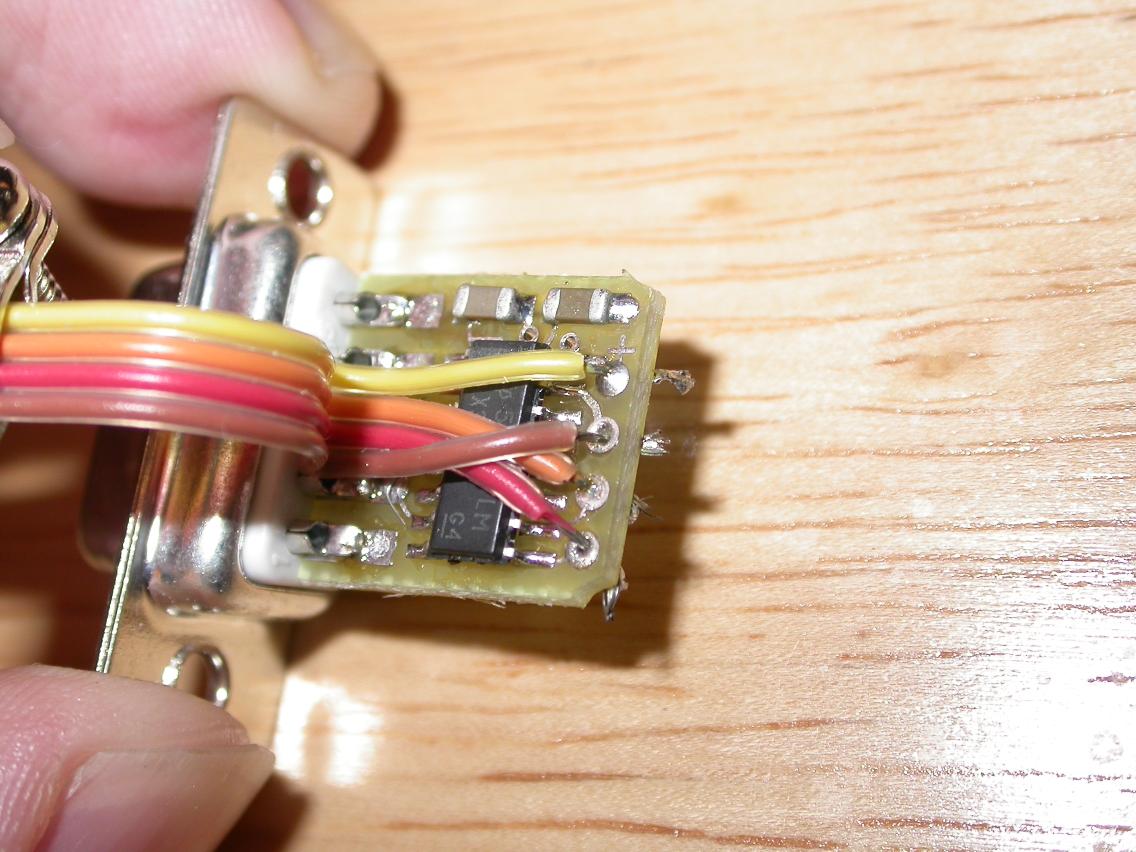
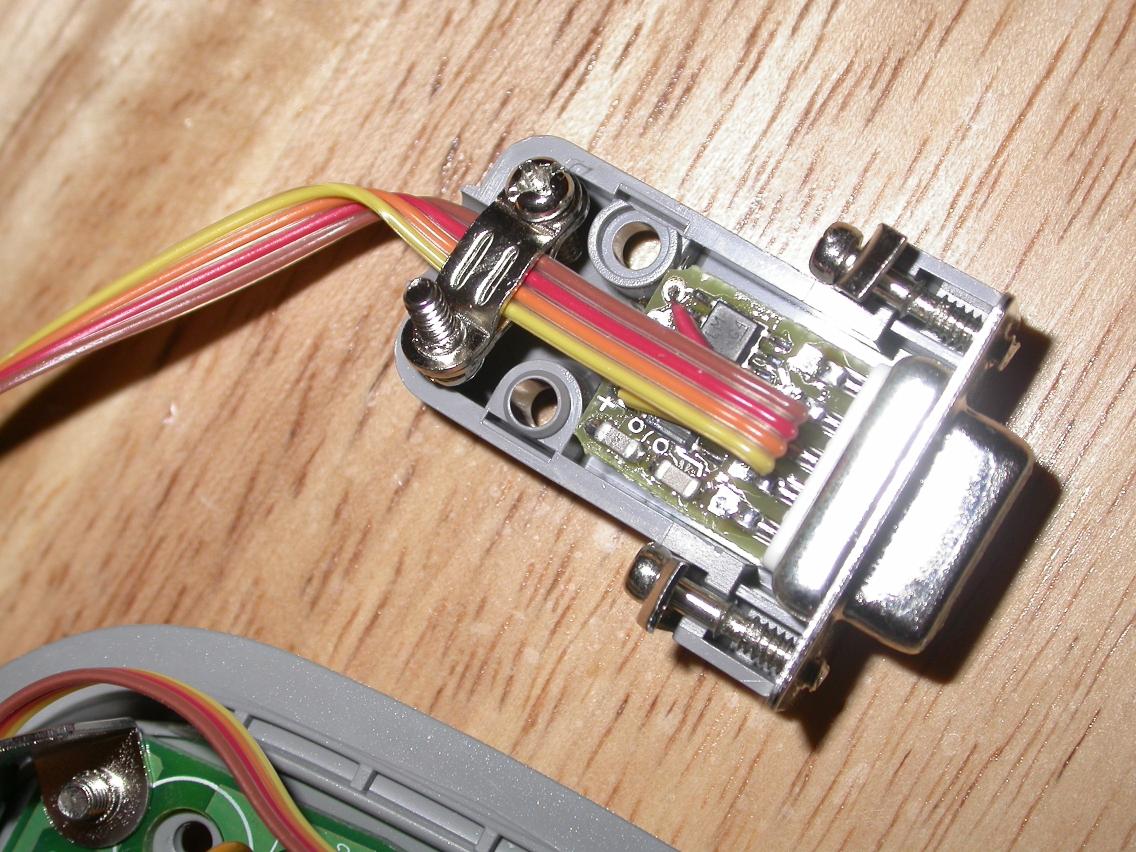
I built my serial cable using a kit. The part number for the kit was A232DBH3v. The kit came with a small length of cable which had to be soldered on one side to the kit's PCB (it was a bit small but if I was able to do it, anybody can do it), and simple instructions were provided. The pinout on the kit's PCB does not match the pinout on the WGT634U's PCB, so some lines had to be crossed.
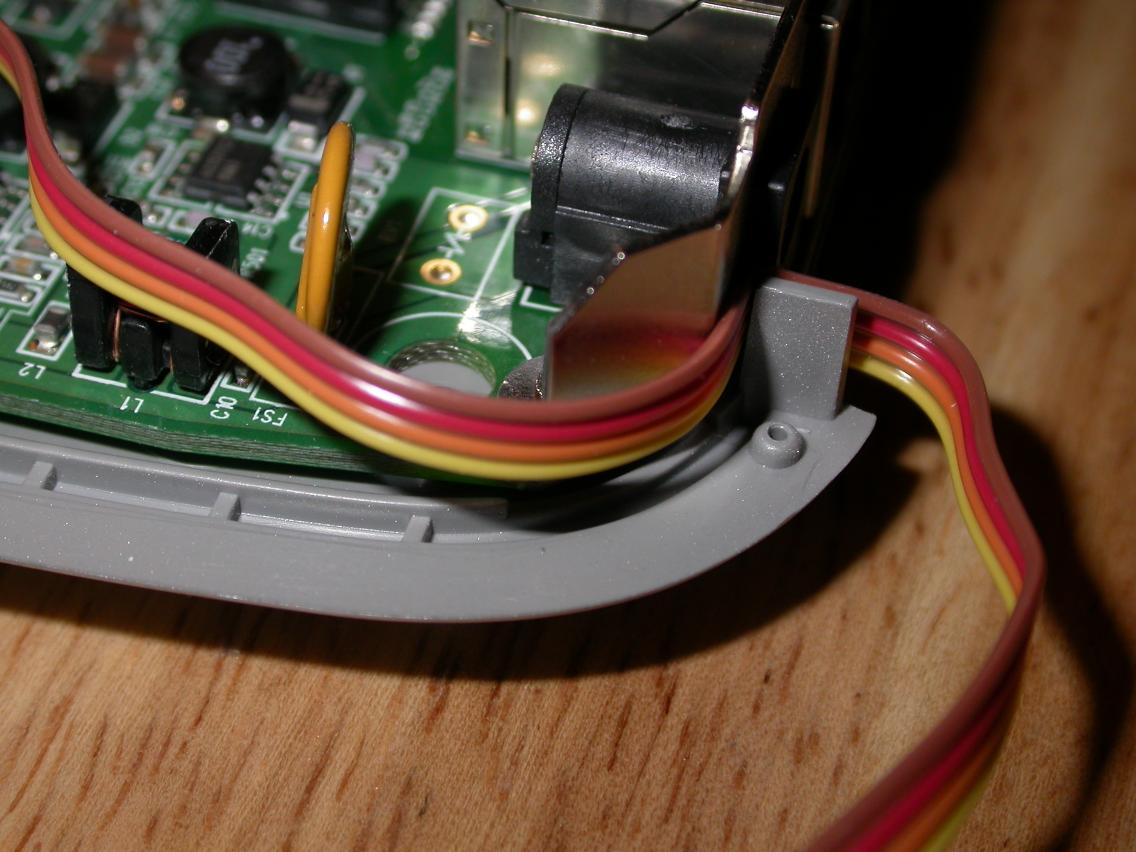
I also had to buy a small IDC connector for the other end of the cable. I separated the 4 lines and had the IDC connector 'bite' on them thru the insulation. No soldering needed - that is the point of using IDC connectors. I got the cable out of the wgt634u by passing it between the removable plastic side and the metal back of the case, near the power connector.
This page also has links to other serial kits. I have not tried them but I suppose they should work, as long as you pick one that provides a 3.3v TTL serial interface.
You probably want to test your serial cable first. Set your terminal emulator parameters to 115200, 8N1, software flow control. If you just boot the wgt634u, you should see boot messages being displayed. The default firmware should also present you with some menus you can interact with once it's done booting. It should be fairly easy to see if your cable works.
The next step is to get into the CFE bootloader. Unplug the router, then press and hold Ctrl-C in the terminal emulator while you reapply the power. You should see some CFE messages starting with a CFE version string and finally get a CFE> prompt. You can get a list of available commands by typing "help".
CFE version 1.0.34 for BCM95365R (32bit,SP,LE)
Build Date: Tue Feb 24 03:21:41 CST 2004 (root@jackylinux)
Copyright (C) 2000,2001,2002 Broadcom Corporation.

Add MAC client version(DNI).
Initializing Arena.
Initializing Devices.
et0: Broadcom BCM47xx 10/100 Mbps Ethernet Controller
CPU type 0x29007: 200MHz
Total memory: 0x2000000 bytes (32MB)
Total memory used by CFE:  0x81BB1280 - 0x82000000 (4517248)
Initialized Data:          0x81BB1280 - 0x81BB3E90 (11280)
BSS Area:                  0x81BB3E90 - 0x81BB45D0 (1856)
Local Heap:                0x81BB45D0 - 0x81FB45D0 (4194304)
Stack Area:                0x81FB45D0 - 0x81FB65D0 (8192)
Text (code) segment:       0x81FB65E0 - 0x81FFFFB0 (301520)
Boot area (physical):      0x01B70000 - 0x01BB0000
Relocation Factor:         I:E23B65E0 - D:01BB0280

Automatic startup canceled via Ctrl-C
CFE> ^C
CFE> ^C
CFE> ^C
CFE> help
Now let's boot a kernel. Get mine here
and make it available on a local TFTP server. Make sure the WAN port on the
wgt634u is connected to that TFTP server (by default, the CFE firmware will
not run TFTP on any of the LAN ports). You should be able to boot the kernel
by using the ifconfig and boot commands. The kernel
will however complain about the lack of a root filesystem after booting:
CFE> ifconfig eth0 -addr=10.0.0.10 -mask=255.0.0.0
Device eth0:  hwaddr 00-0F-B5-XX-XX-XX, ipaddr 10.0.0.10, mask 255.0.0.0
        gateway not set, nameserver not set
*** command status = 0
CFE> boot -z -elf -tftp 10.0.0.1:vmlinuz-2.6.24.2
Loader:elf Filesys:tftp Dev:eth0 File:10.0.0.1:vmlinuz-2.6.24.2 Options:(null)
***************************
****  MAC Client V1.0  ****
***************************
et0macaddr value :flag =0 value=00-0f-b5-xx-xx-xx
et1macaddr value :flag =0 value=00-0f-b5-xx-xx-xx
MAC exist at least one
system ethernet mac exist and not default....

....

VFS: Cannot open root device "sda1" or unknown-block(0,0)
Please append a correct "root=" boot option
Kernel panic - not syncing: VFS: Unable to mount root fs on unknown-block(0,0)
Once you get this working, you could get back to the CFE prompt and change
the environment to automate the TFTP boot. The STARTUP string shows commands
that will be run by CFE at boot time (if you don't interrupt it with Ctrl-C).
Use printenv to see the current value and write it down somewhere.
Set the desired value using setenv -p. You can then try to
autoboot by using the reset command or by power cycling the unit.
Once again the kernel will complain about the lack of a root filesystem,
which is expected at this point.
CFE> printenv
Variable Name        Value
-------------------- --------------------------------------------------
BOOT_CONSOLE         uart1
boardtype            bcm95365r
et0mdcport           0
et0phyaddr           254
STARTUP              ifconfig eth0 -addr=192.168.1.1 -mask=255.255.255.0;boot -elf flash0.os:
kernel_args          console=ttyS1,115200 root=/dev/ram0 init=/linuxrc rw syst_size=8M
configvlan           0x1
et0macaddr           00-0f-b5-xx-xx-xx
et1macaddr           00-0f-b5-xx-xx-xx
CFE_VERSION          1.0.34
CFE_BOARDNAME        BCM95365R
CFE_MEMORYSIZE       32
*** command status = 0
CFE> setenv -p STARTUP "ifconfig eth0 -addr=10.0.0.10 -mask=255.0.0.0;boot -z -elf -tftp 10.0.0.1:vmlinuz-2.6.24.2"
*** command status = 0
CFE> reset


CFE version 1.0.34 for BCM95365R (32bit,SP,LE)
Build Date: Tue Feb 24 03:21:41 CST 2004 (root@jackylinux)
Copyright (C) 2000,2001,2002 Broadcom Corporation.

...

VFS: Cannot open root device "sda1" or unknown-block(0,0)
Please append a correct "root=" boot option
Kernel panic - not syncing: VFS: Unable to mount root fs on unknown-block(0,0)
For reference, let me describe how the kernel we're using was built.
I started with a pristine source tree from kernel.org. As of 2.6.24
Aurelien Jarno's patches for bcm47xx support have been merged in; however
3 small patches had to be applied for proper support
of the PCI bus, MTD flash device and reset button. I then used this
config file. The following file was
used to strip the built image:
bcm47xx-image-postproc.
This file was referenced as the image_clean_hook in /etc/kernel-pkg.conf,
which also had a line stating kimage = zImage.
tar xvjpf linux-2.6.24.2.tar.bz2
cd linux-2.6.24.2
patch -p1 <../0001-MIPS-Scan-PCI-busses-when-they-are-registered.patch
patch -p1 <../0002-MIPS-Add-platform-MTD-support-for-the-WGT634U-mach.patch
patch -p1 <../0003-MIPS-Add-platform-reset-button-support-for-the-WGT634U-mach.patch
make menuconfig
make-kpkg --rootcmd fakeroot linux-image
For reference, I'll describe how I created the base archive on an existing debian mipsel system. You can follow these steps if you have the appropriate hardware setup, or you can just get my base archive here and skip to the next division.
I started by creating a base installation using debootstrap:
debootstrap --include=ntpdate,udev,telnetd etch /root/etch http://mirrors.kernel.org/debian/
In /root/etch/etc I created/edited the following files (some of which will be explained later down, the others are just standard debian config files):
In /root/etch/usr/local/sbin I installed the following scripts and binaries:
I ran in a chroot to install the packaged wgt634u kernel:
mount -t proc proc /root/etch/proc
chroot /root/etch /bin/sh
dpkg -i linux-image-2.6.24.2_2.6.24.2-10.00.Custom_mipsel.deb
Out of the chroot, I used
dselect --admindir /root/etch/var/lib/dpkg/ select
to look at the installed packages and remove a few which seemed
unnecessary. I also used
deborphan -nPzsf /root/etch/var/lib/dpkg/status --guess-all to
find a few unused libraries. Inside of the chroot I purged the unnecessary
packages. Finally I cleaned up a few apt cache files to save some space
in the archive:
dpkg --purge dhcp3-client dhcp3-common
dpkg --purge tasksel tasksel-data
dpkg --purge laptop-detect
dpkg --purge libsasl2 libconsole
apt-get clean
rm /var/cache/apt/*pkgcache.bin /var/lib/apt/lists/*
rm /var/cache/debconf/*.dat-old
rm /var/lib/dpkg/available /var/lib/dpkg/*-old; touch /var/lib/dpkg/available
Finally after exiting the chroot I packed the archive:
rm /root/etch/root/.bash_history
umount /root/etch/proc
cd /root
tar cvjpf etch-base.tar.bz2 etch
Take your USB stick and partition it. I use a 128M swap partition and use whatever else as an ext2 filesystem. Format both partitions and extract the base image:
mkswap /dev/sdX2
mke2fs /dev/sdX1
cd /mnt
mkdir etch
mount /dev/sdX1 etch
tar xvjpf ~/etch-base.tar.bz2
Within /mnt/etch/etc edit the following files (I included reasonable defaults in my base image, adapt them as needed):
Now unmount the base filesystem:
cd
sync
touch /mnt/etch/var/log/wtmp
umount /mnt/etch
rmdir /mnt/etch
Transfer the USB stick to the wgt634u and power it on. Assuming the STARTUP parameter has been set as shown above, the kernel should boot and find the root filesystem on the USB stick. The usual boot messages will be shown on the serial link while init does its work.
Finally you'll get a login prompt on the serial console. Log in as root (no password) and set up a few essential parameters:
passwd
adduser xxxxxx
tzconfig
You'll probably want to install SSH next:
apt-get update
apt-get install openssh-client openssh-server
You're also unlikely to require telnetd at this point:
apt-get purge telnetd
Back up the contents of the mtd2 device:
dd if=/dev/mtd2 of=/root/mtd2
The resulting /root/mtd2 file should be 1310720 bytes and 'file' should identify it as ELF 32-bit LSB executable, MIPS, statically linked, stripped. The content of this file is the kernel from the original wgt634u firmware.
We can reflash /dev/mtd2 to use our kernel instead:
apt-get install mtd-tools
flash-vmlinuz -v
/usr/local/sbin/flash-vmlinuz is a small script I've made that runs a few validity checks and then flashes the current /boot/vmlinuz file. It's also configured within /etc/kernel-img.conf so that such flashing automatically happens whenever installing or removing kernel packages.
Now we need to get back to the CFE prompt and setup the STARTUP string to autoboot from flash. This STARTUP string should work:
CFE> setenv -p STARTUP "ifconfig eth0;boot -z -elf flash0.os:"
ifconfig sets up the hardware MAC address - At some point
I found that previous versions of linux had weird issues without it,
where it would reply to pings and UDP packets but ignore any TCP SYN packets.
I think this has been fixed in newer kernel versions, but I still keep
the ifconfig around just to be safe - call it superstition if you will :)
The boot command tries to boot from flash, and should succeed.
If it fails however, CFE will issue its prompt - or, if we flash a bad
kernel onto mtd2, we can always get a CFE prompt by pressing Ctrl-C while
the wgt634u is booting up.
I initially found the debian package management tools to be unbearably
slow on the wgt634u. Part of the issue seems to be that dpkg/dselect
have a large working set, and dselect in particular will often eat
up to 50MB by itself. This causes a lot of swapping issues and makes
things run extremely slow. dselect itself is easy to avoid, but the other
package management tools still call dpkg to install packages, and dpkg
also takes a lot of memory parsing the available file before
each operation.
One possible workaround would be to never use dselect. This actually helps
with the dpkg memory usage issue as well, because the available
file won't grow much if you never run the dselect update command.
So, just don't ever run dselect and package management performance should
stay acceptable.
Otherwise, you could try a few dpkg/dselect patches I made to reduce memory usage and improve performance. If you ever run dselect, they will make a large difference (including on subsequent dpkg operations).
The wgt634u does not include a hardware clock chip. No big deal, we can synchronize time using ntp. However, there are a few complications to get this working well.
The first issue is that the ntpdate package tries to run in the background, when any network interface is configured. This is probably fine for systems that only need sub-second adjustments, but it triggers a lot of subtle issues when running on clockless systems, and usualy ends up setting the time incorrectly too (don't ask me why, I have not fully figured it out).
My solution is to add 'exit 0' at the top of /etc/network/if-up.d/ntpdate and create a /etc/init.d/local-ntpdate script to set up the time, in the foreground, at boot time. /etc/init.d/local-ntpdate is linked from /etc/rcS.d/S42local-ntpdate to make sure it runs just after the network interfaces are configured.
The second issue is that the clock can not be correctly set before the network is started. This breaks a few things such as boot-time fsck after a given number of days, for example. My fix is to estimate the time to be 10 seconds after the date of the /var/log/wtmp file, which should hold a record with the date of the last reboot. This is of course inaccurate, but still better than just using the default system date of 1/1/2000. This is done in /etc/init.d/local-setclock, which is linked from /etc/rcS.d/S08local-setclock, thus running immediately before checking the root filesystem.
By default, the internal switch is configured so that untagged packets go to the WAN port, and any packets tagged with 'VLAN 1' go to the LAN ports.
VLAN support is not difficult to configure on the debian side:
apt-get install vlan
You then need to configure an eth0.1 interface in /etc/network/interfaces.
You can set a different switch configuration using the robocfg utility - for example, this could be used to enable packet switching between all 5 ports (LAN and WAN), or to configure each LAN port as a different VLAN so we can route between all 5 ports rather than rely on hardware packet switching.
The best way to get familiar with robocfg is to just try things. You should
use the serial connection as you're likely to kill your network a few times.
"robocfg" gives some help screen, "robocfg show"
shows the current switch configuration. The hardware port numbers on the
switch deserve an explanation as they do not match the numbered labels/LEDs
in front of the wgt634u:
When configuring VLANs, port numbers can be followed by 't' or 'u' which stand for 'tagged' or 'untagged'. You most likely want to keep ports 0-4 (LAN/WAN) untagged which is the default. Port 5 (the internal port) can be left untagged in one VLAN (which will be accessible as the eth0 interface) and tagged in other VLANS (which will be accessible as eth0.tagnumber).
It is recommended to disable the switch while you reconfigure it, to avoid packets being switched in unpredictable ways during reconfiguration.
The default configuration (WAN connector accessible as eth0, LAN connectors 1-4 switched together and accessible as eth0.1) would be configured using:
robocfg switch disable \
	vlans reset \
	vlans enable \
	vlan 1 ports "0 1 2 3 5t" \
	vlan 2 ports "4 5u" \
	switch enable
To have all 5 LAN/WAN connectors switched together and accessible as eth0 one would specify:
robocfg switch disable vlans reset vlans enable \
	vlan 1 ports "0 1 2 3 4 5u" \
	switch enable
To have the WAN connector accessible as eth0 and LAN connectors 1-4 accessible as eth0.1 to eth0.4 one would specify:
robocfg switch disable vlans reset vlans enable \
	vlan 1 ports "3 5t" \
	vlan 2 ports "2 5t" \
	vlan 3 ports "1 5t" \
	vlan 4 ports "0 5t" \
	vlan 5 ports "4 5u" \
	switch enable
On my system I created a /etc/init.d/local-robocfg file with the desired settings and made sure to link it from /etc/rcS.d/S38local-robocfg so it gets run at boot time right before enabling the network interfaces.
The CFE environment is stored in the /dev/mtd4 flash partition.
The image we use includes the cfe-env tool for editing
the environement.
The CFE environment variables can be listed using the -l option:
% cfe-env -l /dev/mtd4
boardtype=bcm95365r
et0mdcport=0
et0phyaddr=254
kernel_args=console=ttyS1,115200 root=/dev/ram0 init=/linuxrc rw syst_size=8M
configvlan=0x1
et0macaddr=00-0f-b5-xx-xx-xx
et1macaddr=00-0f-b5-xx-xx-xx
STARTUP=ifconfig eth0;boot -z -elf flash0.os:
Existing CFE environment variables can be cleared using the -c
option or modified using the -m option. New environment
variables can also be set using the -s option.
At boot time, CFE performs the following functions:
When the embedded switch is configured, the default CFE setting is to
switch untagged frames to the WAN port only - which is the reason one
can only use TFTP on the WAN port. This behavior can be modified by
issuing "unsetenv configvlan" and cold-rebooting the wgt634u.
When configvlan is not set, CFE sets up the switch so that untagged frames
go to every port (LAN and WAN) - thus allowing TFTP booting on any port.
After being initialized, the embedded switch also takes about a second before it will actually start switching packets. CFE will normally already be in the process of loading a kernel from flash at that point, but the embedded switch will start switching packets between the LAN ports (or between all ports if configvlan has been unset) before the loaded kernel starts running. This can be a problem if you want to use the wgt634u as a router with 5 different ports and do not want any packets to "leak" between the LAN ports while the wgt634u is booting. My workaround to this issue is to include a command in the STARTUP string which will disable the embedded switch (same as running "robocfg switch disable", but from CFE instead of waiting for linux to get started). There is no existing CFE command to achieve this, but the "e" command allows us to poke around and disable the embedded switch:
CFE> setenv -p STARTUP "e b8001414 5f420001;e b8001414 5f620004;e b8001414 5f460b01;ifconfig eth0;boot -z -elf flash0.os:"
With this setting, no packets will be 'leaked' at boot time by the switch as it will get disabled before it actually starts switching packets. The switch will however stay enabled if we interrupt CFE by pressing Ctrl-C at boot time, which could be useful since it still allows booting with TFTP from a CFE prompt.
The same settings can also be changed using the cfe-env tool:
% cfe-env /dev/mtd4 -c configvlan -m STARTUP="e b8001414 5f420001;e b8001414 5f620004;e b8001414 5f460b01;ifconfig eth0;boot -z -elf flash0.os:"
The power led can be controlled to light either green or amber, or blink or whatever, using the /sys/class/leds/power/* control files.
Within CFE, the power led can also be set to amber using
"e b8000064 f5 cb" (see
http://openwrt.pbwiki.com/GPIO).
Also the kernel we're using includes support for the reset button at the back of the wgt634u. Pressing it sends a SIGINT to the init process, which causes it to run the ctrlaltdel command defined in /etc/inittab.
It is also possible to install on a wgt634u without having installed the serial port hardware. The downside is that you don't have access to the CFE bootloader that way, which means that it's quite easy to end up with an unbootable box if you're not super careful. Personally I would only recommend this if you have several wgt634u machines and don't want to switch your serial port between these - so you can still try things on the serial equipped box, and then deploy on the others. Anyway, here's how to install without a serial line:
First you need to install the 1.4.1.10 version of the netgear firmware. Note that some older firmware versions have bugs that might prevent a direct upgrade - for example on a wgt634u I had with 1.4.0.5 firmware, I had to upgrade to 1.4.0.6 before I could go to 1.4.1.10...
Then you install the wgt634u-upgrade.cfg file from openwrt. This is done using the "backup settings" menu and then the "restore" button. More complete instructions can be found on the openwrt wiki. Once this is done, you must clear your browser cache. A new "upgrade to openwrt" menu will show up in the wgt634u's web UI.
At this point, you should connect an USB stick with the base filesystem
set up as described above. Using the "upgrade to openwrt" menu, you must
upload an uncompressed kernel image:
zcat vmlinuz-2.6.24.2 > vmlinux and then upload the vmlinux
file as an openwrt image.
After a while, the wgt634u should reboot to our kernel and access your USB stick as its root filesystem. When the front power led starts blinking in a heart-beat way, the system should be ready. You can then connect as root using telnet to the 10.0.0.10 address. You probably want to quickly switch to a gzipped kernel, in order to end up with the same configuration as assumed with the CFE based installation procedure:
# apt-get update
# apt-get install mtd-tools
# flash-vmlinuz -v
# cfe-env -m STARTUP="ifconfig eth0;boot -z -elf flash0.os:" /dev/mtd4
From then on, the instructions from "Booting debian on the wgt634u" above should work. Once again, the major downside here is that you don't have access to the CFE bootloader so it's very easy to get stuck with an unbootable system. If that happens, hopefully you can still connect a serial line and fix things using CFE.
I recommend to use the wgt634u in a vertical position using the stand provided by netgear. This helps a lot with cooling - the device gets very warm if you try to run it horizontally without its stand.
Also, the power available to the wgt634u is quite limited. The device runs fine by itself or with a single USB stick attached, but there is not a lot of extra power available for the USB bus and/or higher power minipci devices. If you want to add extra USB devices, it is best to connect them on a powered USB hub and if you want to change the internal minipci device, you might have to check for power consumption issues (i.e. using a higher power WIFI transmitter might result in distortion and packet loss if running at full power). The issue does not seem to be helped by using a larger capacity external power supply. Some people have theorized that the limitation might come from the internal voltage conversion circuits and that using a lower voltage external power supply (7.5V instead of 12V) might actually help (apparently the voltage conversion chip is specced for 6V to 12V inputs). I have not tried this as I'm not having power issues with my wgt634u boxes myself.
Please email me at walken at zoy dot org if you found this page useful.